In my previous posts I defined a number of use cases I want to process with. Especially, I was interested in GPS Tracking using a mobile phone and already posted about it. I tried to reuse my experiences with GPS Track for another GPS related subject: geo-tagging / geo-coding. The idea behind a geo-coded image is to embed the geographical coordinates in the image data. Mostly the information is stored using EXIF metadata. There are three approaches how to create geo-oded images:
- Use a camera supporting GPS directly or some GPS add-on and put geo location in the time of image capture.
- Assign the location to the images afterwards using e.G. Flickr and locating the image on the map manually.
- Record the GPS track (Usecase 1.2) during the photo session and use time correlation information to assign location to images.
Surprising, but I want to tell about the third approach. For that you need a GPS track and some programs that read the timestamp from image metadata and search for the nearest (timely) track point in your track and write GPS coordinates (latitude, longitude, altitude) back to EXIF metadata of the image. Sounds like a simple batch process, doesn’t it?
Recording GPS data
The first setback I suffered was that my tracks recorded with GPS Track does not contain any time information. GPS Track program remove all timestamps, which makes the usage of the program impossible for the geo-tagging. I searched for an alternative and found GPS Log. It is available on a German page but the program supports English, German, Dutch and Polish.
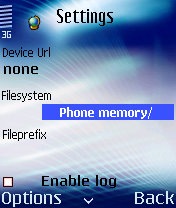
After the installation on the J2ME enabled mobile phone supporting Bluetooth stack (JSR-83) you have to set up the program. The settings are started automatically, but can be changed later in the main menu. The basic part of the configuration is a search of the GPS receiver and setup of the log file. Go to device URL, devicelist, inquiry and select your GPS receiver. Then enable the logging and select an appropriate place, where the tracks can be saved.

The main menu of the program is structured as follows:
- start/stop start/stop tracking
- settings
- device url the url of the GPS device, in form btspp://DEVICE-ID:com-port
- devicelist list of available BT devices
- inquiry start search for devices
- devicelist list of available BT devices
- filesystem a place where to write the track files
- fileprefix name prefix of the track file
- enable log write a track file?
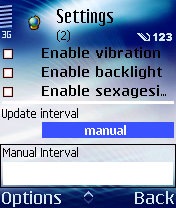
- enable vibration enable phone vibration
- enable backlight switch backlight on?
- enable sexagesian coordinates format the coordinates in grade, minute, second instead of fractional of grade
- update interval time between two track points
- manual interval if update interval set to manual – number of seconds between two track points
- loglevel level of logging (for debugging purposes)
- device url the url of the GPS device, in form btspp://DEVICE-ID:com-port
- console java console
- clear clears the console
- save saves the console to a file
- about version information (1.29 is the last currently available)
- exit
After the simple configuration you are done and can (hopefully) see something similar on your display:
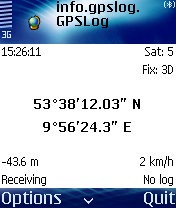
The resulting file is stored in NMEA 0183 format and contain the movement track. It can be transmitted to the workstation together with the images from you camera. Now you are ready for the offline part of the data processing.
Post processing
In the following I present three approaches for the same goal: read the time information of images and track points, find the correlation and write the results back.
Manual (GPSBabel, gps2photo)
I tried it manually first, following some instructions of a German computer magazine c’t. For using GPSBabel to convert from NMEA 0183 to GPX, the command for this is gpsbabel.exe -t -w -i nmea -f track.txt -o gpx -F track.gpxx where track.txt is NMEA file name and track.gpxx is the target file name. GPSBabel is very helpful, because additionally to the standards like NMEA it also supports vendor specific standards like Garmin, Magelan, Tom Tom and others. A useful front end can be found at GPSVisualizer. Then I used gps2photo Perl script, that writes the coordinates from GPX file to the corresponding images. The problem with that is, that you require a Perl installation (Active Perl in case of Windows) and Image::ExifTool and XML::Parser modules. The Active Perl 5.10 I installed only contain the latter, but not the first one, so I had to download and install it manually. After the installation you need to run perl gpsPhoto.pl –dir c:\photos –gpsfile c:\photos\track.gpxx for processing the directory of images c:\photos with a trackfile located in c:\photos\track.gpxx. I really got the result after hours of installation and configuration, I and swore never to repeat this. The resulting GPS tags are finally:
[source lang=”bash”]
GPSVersionID: 2, 2, 0, 0
GPSLatitudeRef: ‘N’
GPSLatitude: 53, 38, 18527/1537
GPSLongitudeRef: ‘E’
GPSLongitude: 9, 56, 40876/1671
GPSAltitudeRef: 1
GPSAltitude: 53
GPSTimeStamp: 15, 28, 41
GPSImgDirectionRef: ‘T’
GPSImgDirection: 0
GPSMapDatum: ‘WGS-84’
GPSDateStamp: ‘2008:01:06’
[/source]
During the writing of this article I looked on the Internet for some resources and found a list of software that can be useful for geo-tagging/geo-coding on the homepage of GPSlog. Because I only have a Windows workstation, I could try out GPicSync and PhotoMapper. For the Mac users the GPS Photo Linker seems to be a standard software.
GPicSync
GPicSync is a small free available program written in python that executes the steps above automatically. At the time of writing it is available in version 1.23 beta. In addition to simple geo-coding it supports export of the track as Google Earth KLM or Google Map, read directly NMEA or GPX, supports additional geo-tags and geo-names and supports camera RAW formats. Because I’m using a Canon Rebel XTi (EOS 400D) it is of utmost importance for me to geo-code the raw files directly. This feature makes this program to my favorite.
Copiks Photomapper
Photomapper allows to load GPS information file and images and write the GPS location back to the images. The export to Google Earth is also possible. The UI looks more advanced as in the case of GPicSync, but the program only supports JPEG images, so GPicSync remains my favorite.
For own development
In the time between my headache with manual tagging and finding of GPicSync I searched over the web for resources of reading and writing of EXIF metadata and parsing NMEA in Java. NMEA 0183 seems to be trivial, There are several interesting developments according to the EXIF subject:
- jrawi is a Java library for reading images coded in “camera raw” format;
- metadata extractor is a generic framework to read EXIF metadata. Currently only JPEG format is supported, but the authors mention that support of additional media types should be simple.
- The most promising development seems to be Sanselan that should become an Apache project soon. In contrast to the others, it support writing of images, which makes it a first class candidate self-made solution. Unfortunately, Sanselan does not support RAW formats. I played around with the framework – it seems to be pretty convenient.
Technorati tags: geotagging, geocoding, gpslog, gpstrack, gps, bluetooth, mobile, gpicsync, photomapper, java, image, jrawi, metadata extractor, sanselan